Thursday, 17 November 2016

ODBC connection in AX 2012

ODBC is to access data of any database mentioned. We use X++ code to access.
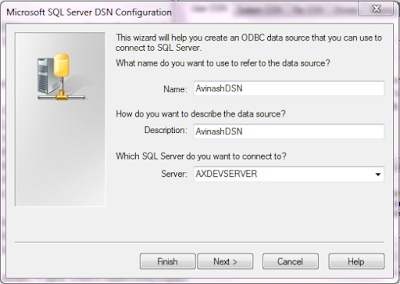
1. Start -> admministrative tools ->Datasources(ODBC) -> Add ->Sql Server->Finish.
Next, Next,Finish.

2.Write following job to set ODBC connection.
static void Job19(Args _args)
{
    OdbcConnection oDBC;
    LoginProperty  login;
    Statement      stmt;
    ResultSet      rs;
    ResultSetMetaData rsmd;
    FCCAirports    fCCAirports;
    CustTable      CustTable;
   
    login = new LoginProperty();
    login.setDSN("AVinashDSN");  
    login.setDatabase("DynamicsAXDemo");
   
    oDBC = new OdbcConnection(login);
   
    try
    {
        stmt = oDBC.createStatement();
        rs   = stmt.executeQuery("select AccountNum,currency from custtable");
   
        while(rs.next())
        {
            info(rs.getString(1));
            info(rs.getString(2));
        }
    }
    catch
    {
        error('Unexpected error');
    }
}
Thursday, 6 October 2016

Adding filter on form with one and multiple range values

1.Created two tables and on e form


2. Take an EDT and give relation to PCustomerTable.CustomerId and extends to outbound control on form(openmode:edit)

3.


In clicked method
PCustomerTable_ds.filter(fieldNum(PCustomerTable,CustomerId),FilterButton.valueStr());

4.

For multiple selection:

In form methods:
public void multiLookup()
{
    Query query = new Query();

    QueryBuildDataSource qbds;

    qbds = query.addDataSource(tableNum(PCustomerTable));

    msCtrlCust = SysLookupMultiSelectCtrl::constructWithQuery(element, CustomerIDFilter, query);
}

public void init()
{
    super();
    element.multiLookup();
}

public class FormRun extends ObjectRun
{
    SysLookupMultiSelectCtrl msCtrlCust;
    container                values;
}

5. In PCustomerTable -->executequery()
public void executeQuery()
{
    PCustomerTable       ptc;
    PItemTransactions    pit;
    query                query;
    QueryBuildDataSource qbds,qbds1;
    QueryBuildRange      qbr;
    QueryRun             qr;
    int                  i;
    int64                r;
    container            c;

    ;

    query = new query();
    qbds  = query.addDataSource(tableNum(PCustomerTable));
    qbds1 = qbds.addDataSource(tableNum(PItemTransactions));
    qbds1.relations(true);


    values = msCtrlCust.get();
    for (i = 1; i <= conLen(values);i++)
    {
        r = conPeek(values,i);
        Ptc = PCustomerTable::find(r);
        c = conIns(c,i,Ptc.CustomerId);
    }
    qbds.addRange(fieldNum(PCustomerTable,CustomerId)).value(con2Str(c));
    qr = new QueryRun(query);
    while (qr.next())
    {
        ptc = qr.get(tableNum(PCustomerTable));
        PCustomerTable_ds.query(qr.query());
    }
    super();


}


Wednesday, 21 September 2016

Restrict mutiple logins of same user in ax 2012

Note:Compied from external source

Copy Paste the Following Code in startupPost method of info class in AOT

void startupPost()
{
// To restrict user login form second login
xSession session;
SysClientSessions SysClientSessions;
UserId currentUserId;
int counter;
;
currentUserId = curUserId();
if(currentUserId!="Admin")// Allow Admin User to login multiple time
{
while select SysClientSessions
where SysClientSessions.userId == currentUserId &&
SysClientSessions.Status == 1 // 1 : Login 0 : Logout
{
session = new xSession(SysClientSessions.SessionId, true);
if (session && session.userId())
{
counter++;
}
}
if(counter>=2)
{
Box::stop("Already Logged-in : The same user id can't log in twice.");
infolog.shutDown(true);
}
}
}

Wednesday, 14 September 2016

Creation of simple workflow in AX 2012


Creating Workflow for courses in HumanResource Module.
  • Create WFstatus enum


  • Create query for that table


  • Add workflowstate enum as a field in HRMCourseTable
  • Override CanSubmittoworkflow() of table with following code
        public boolean canSubmitToWorkflow(str _workflowType = '')
{
  boolean ret;
     ret = super(_workflowType);
     ret = this.RecId != 0 && this.WorkflowState == WorkflowState::NotSubmitted;
     return ret;
}

  • Also write Updateworkflowstate method(Not override)
public static void UpdateWorkflowState(RefRecId _recId, WorkflowState _state)
{
    HRMCourseTable hRMCourseTable = hRMCourseTable::findByRecId(_recId, true);

    ttsBegin;
    hRMCourseTable.WorkflowState = _state;
    if(hRMCourseTable.RecId)
        hRMCourseTable.update();
    ttsCommit;
}
  • Create/Identify WF category(module)
  • Create WF type from wizard


  • Create WF approval from wizard and give appropriate label names to all created MIs

  • Private projects will be created.
  • In WF Type main() of submitMngr class write as below and make necesary changes 
public static void main(Args args)
{
    HRMCourseTable                          hRMCourseTable;
    FormRun                                 formRun = args.caller();
    recId                                   recId = args.record().RecId;
    WorkflowCorrelationId                   workflowCorrelationId;

    WorkflowTypeName                        workflowTypeName =workflowtypestr(CoursesWFType);

    WorkflowComment                         note ="";
    WorkflowSubmitDialog                    workflowSubmitDialog;

    workflowSubmitDialog = WorkflowSubmitDialog::construct(args.caller().getActiveWorkflowConfiguration());
    workflowSubmitDialog.run();

    if (workflowSubmitDialog.parmIsClosedOK())
    {
        recId = args.record().RecId;
        hRMCourseTable = HRMCourseTable::findByRecId(recId);
       //We can validate record before submite and will through error
        note = workflowSubmitDialog.parmWorkflowComment();
        try
        {
            ttsbegin;
            workflowCorrelationId = Workflow::activateFromWorkflowType(workflowTypeName,recId,note,NoYes::No);
            hRMCourseTable::UpdateWorkflowState(recId,WorkflowState::PendingApproval);

            info("Submitted to workflow.");
            ttscommit;
        }
        catch(exception::Error)
        {
            info("Error on workflow activation.");
        }
    }
    formRun.dataSource().research(1);
    formRun.reload();
}
  • In the WFType Eventhandler write appropriate code in existed methods
public void completed(WorkflowEventArgs _workflowEventArgs)
{
    if (_workflowEventArgs.parmWorkflowContext().parmTableId() == tableNum(HRMCourseTable))
        HRMCourseTable::UpdateWorkflowState(_workflowEventArgs.parmWorkflowContext().parmRecId(),WorkflowState::Approved);
}

  • In WFApproval ResubmitActionManager class, write following
public class CoursesWFApprovalResubmitActionMgr
{
    RecId           recId;
    Args            args;
}

protected boolean actionDialog(WorkflowWorkItemActionDialog _workflowWorkItemActionDialog)
{
    _workflowWorkItemActionDialog.run();
    return _workflowWorkItemActionDialog.parmIsClosedOK();
}


protected WebActionItemName getEPReSubmitAction()
{
    WebActionItemName WebActionItemName;
    return WebActionItemName;
}


public Args parmArgs(Args _args = args)
{
    args = _args;

    return args;
}


public boolean reSubmit()
{
    WorkflowWorkItemActionDialog    workflowWorkItemActionDialog;
    WorkflowWorkItemTable           workItem = args.caller().getActiveWorkflowWorkItem();
    boolean                         ret;
    boolean                         dispatchWorkItem = false;
    WorkflowComment                 comment;
    UserId                          targetUser;

    if (workItem.RecId)
    {
        workflowWorkItemActionDialog = WorkflowWorkItemActionDialog::construct( workItem,
                                                                                    WorkflowWorkItemActionType::Resubmit,
                                                                                    
new MenuFunction(args.menuItemName(), args.menuItemType()));
            if (this.actionDialog(workflowWorkItemActionDialog))
            {
                comment = workflowWorkItemActionDialog.parmWorkflowComment();
                targetUser = workflowWorkItemActionDialog.parmTargetUser();

                dispatchWorkItem = true;
            }

    }

    if (dispatchWorkItem)
    {
        WorkflowWorkItemActionManager::dispatchWorkItemAction(workItem,
                                                                comment,
                                                                targetUser,
                                                                WorkflowWorkItemActionType::Resubmit,
                                                                args.menuItemName(),
                                                                args.menuItemName() == this.getEPReSubmitAction());
        ret = true;
    }

    return ret;
}


public static void main(Args args)
{
    CoursesWFApprovalResubmitActionMgr submitManager = new CoursesWFApprovalResubmitActionMgr();
    submitManager.parmArgs(args);
    submitManager.reSubmit();
}

  • Drag WFapproval into WFtype-->supported elements
  • Give Form design properties(WorkflowEnabledyes,WorkflowDataSource,WorkflowType)
  • Generate Incremental CIL.
  • Configure WF


  • Double click on approval element


Wednesday, 24 August 2016

Role based Security in AX

·         To setup security roles to a user need to follow following hierarchy
·         Create Security role
Go to System administration > setup > security > security roles
Give security role name by clicking new button


·         Create Duties, privileges and permission
Go to System administration > setup > security > security privileges
Click new to create a new process cycle, again click new to create duty, again click new to create new privilege


By keeping the cursor on newly created privilege, add permission and give access level

·         Assign duties to the role
Go to System administration > setup > security > security roles
Select your security role and click on Add in role content then select the duty and privilege from your process cycle
·         


      Assigning user to roles
Go to System administration > setup > security > Assign users to roles
Select your role and click on manually assign/exclude user from users assigned to role and select the users

Now Logon to Microsoft dynamics AX with the assigned user login credentials and check the permission level you applied is working or not

Note: 1. for system administrator role no privilege takes effect as he has full control


Thursday, 30 June 2016

X++ Program to print 143 as 100+40+3

static void Job10(Args _args)
{
    int r,n,i,j;
    real mul=0.1,q;
    str k;
    ;
    n = 143;
    q = n;
    for(i=1;q>=1;i++)
    {
        mul = mul * 10;
        r = (q mod 10)*mul;
        q=q/10;
       if(k)
        k = int2str(r)+"+"+k;
        else
            k=int2str(r);
    }

    info(k);

Saturday, 14 May 2016

Update the records in table with validtimestate

        ttsBegin;

          HcmEmploymentEmployee.selectForUpdate(true);
          HcmEmploymentEmployee.validTimeStateUpdateMode(ValidTimeStateUpdate::Correction);
          HcmEmploymentEmployee.ProbationEndDate =      DateTimeUtil::addDays
          (employmentStartDate,HcmEmploymentEmployee.ProbationDays-1);
          hcmEmploymentEmployee.update();

        ttsCommit;

Wednesday, 16 March 2016

How to debug SSRS report RDP model in AX 2012

1. Verify whether you checked Enable break points, enable global breakpoints on server

2. Simply keep breakpoint; in your code
3. If that is not worked, then
    a. In class declaration extend SrsReportDataProviderPreProcess instead of                 SRSReportDataProviderBase
   b. Make changes of Temperory table properties as below
       i. Table type --> Regular
       ii. CreatedTransactionId --> Yes
4. Add below line in process method of DP class
    Temptablename.setConnection(this.parmUserConnection());

Happy Daxing.....

Lookup() and jumpref() methods in AX 2012

1. Lookup method we can write at table level, form Data source level and Form control level.
Now writing at Data source level(Form: Organization hierarchy, Table: Organization hierarchy)

public void lookup(FormControl _formControl, str _filterStr)
{
    SysTableLookup sysTableLookup =      SysTableLookup::newParameters(tableNum(DivisionTable), _formControl);
    Query query = new Query();
    QueryBuildDataSource qbds,qbds1;


    sysTableLookup.parmQuery(query);
    sysTableLookup.addLookupField(fieldNum(DivisionTable, DivisionCode));
    sysTableLookup.addLookupField(fieldNum(DivisionTable, DivisionName));
    qbds = Query.addDataSource(tableNum(DivisionTable));
    qbds1 = qbds.addDataSource(tableNum(DivisionCompanyLine));
    qbds1.relations(true);
    qbds1.addRange(fieldNum(DivisionCompanyLine, DataArea)).value(OrganizationHierarchy.Company);

    sysTableLookup.parmQuery(query);
    sysTableLookup.performFormLookup();
}

2. Writing jumpref() at Form DS level

public void jumpRef()
{
    Args            args;
    MenuFunction    menuFunction;
    ;
    args = new Args();
    menuFunction = new MenuFunction(menuitemDisplayStr(MenuItemName), MenuItemType::Display);
    args = new Args(menuFunction.object());
    args.caller(element);
    menuFunction.run(args);
}

Friday, 5 February 2016

Pack() and unpack() methods in Dynamics AX

Pack and unpack is Dynamics language for serialization -- putting object-specific data in a writeable format and later reading it back to create an object in the exact same state.
Most of the interactive objects in Dynamics will automatically check for saved user data when invoked and instantiate accordingly.  Perhaps you remember running a report and the next time you opened the report your previous query and parameter values were already there.  This happens because of pack and unpack.
The majority of what makes pack and unpack confusing is macros, so let's do a simple example not using macros at all.  Let's say we have a class that has two date values I need to persist between runs: startDate and endDate.
So when pack() gets called, I need to store both variables.  (If you don't understand the way containers work, look them up on MSDN first, otherwise this won't make sense).
container pack()
{
return [startDate, endDate];

The framework will take whatever pack returns and store it in user data.  So when the object is instantiated, unpack() gets called in order to reinitialize the values.
boolean unpack(container _packedValues)
{
[startDate, endDate] = _packedValues;
return true;
}

Follow what's happening here?  We expect _packedValues to contain startDate and endDate in that order, so we assign those values to our class variables.
Now let's imagine we want to add another class variable that needs to be stored: isPosted
To do this, we'll have to modify our pack to return
[startDate, endDate, isPosted]
and our unpack to assign all three:
[startDate, endDate, isPosted] = _packedValues;
Hm, but what about values that were stored before our modification?  That container assignment won't work because _packedValues will only contain 2 values (startDate and endDate).  So let's make the first value in our packed data identify the version of the packed data so we can handle old values without crashing.
container pack()
{
return [1, startDate, endDate, isPosted];
boolean unpack(container _packedValues)
{

boolean ret = true;
int version; 

;
if (conpeek(_packedValues) == 1)
{
[version, startDate, endDate, isPosted] = _packedValues;
}
else
{
ret = false;
}
return ret;

Ok, so now if I need to add more variables, I need to change the version number in both pack and unpack, but now old data will make unpack() return false, which will initialize the parameter defaults.
So now let's add some macros so we only have to change one spot when we change what we want to pack.  In our classDeclaration, we'll create 2 macros: one for the version of the data, and one for the values we wish to store.
classDeclaration()
{
#define.CurrentVersion(1)

#localMacro.CurrentList
startDate,
endDate,
isPosted
#endMacro 
If you're unfamiliar with macros, what they do is fill in exactly what the macro says at compile time.  So whenever you write #CurrentVersion, the compiler fills in '1'.  Whenever you write #CurrentList, the compiler fills in 'startDate, endDate, isPosted'.  So now we can change our pack() and unpack() to look like this:
container pack()
{
return [#CurrentVersion, #CurrentList];

boolean unpack(container _packedValues)
{
int version; boolean ret = true;
;
if  (conpeek(_packedValues) == #CurrentVersion)
{ [version, #CurrentList] = _packedValues;
}
else
{
ret = false;

return ret;
}


Note:Copied from https://community.dynamics.com/ax/f/33/p/67248/122709

Tuesday, 5 January 2016

Installation of Hyper-v of AX7


Prerequisite to install AX7 Hyper-V
1.Drive size needed: 150GB
2.RAM: 12GB(16GB recommended
3.OS: windows 8/8.1/10(PRO) or windows server 2012/2012R2
4.Office365 account(atleast trail)

Step 1: Run application, that extracts remaining zips, constitute to 113GB

Step 2: Enable Hyper-v
Search "windows Features" enable Hyper-V.
For Server Click on "Add roles and Features"


Step 3: Search "Hyper-V management"
Create Virtual switch network


Step 4:Create New virtual Machine


RAM size should be allocated min 8GB, So enter 8000MB


Give the location of extracted .VHD location

Step 5:
After successful creation of VM,

Search Hyper-V
Click connect and start
password:pass@word1

Step 6:
click on the below Icon to register

Step 7:
Enter your Office 365 account ID and wait for confirmation dialogue
Step 8:
Enter below link in browser in hyper-V and login with office365 account


Step 9:

For development, need to go visual studio.
Project>new>Microsoft dynamics
In visual studio, View>application explorer you will get AOT.

Happy Daxing... :)

Note: Command to enable Hyper-V in Windows 11 Home single laguage edition
Open Cmd as administartor and run

@echo off pushd "%~dp0"
dir /b %SystemRoot%\servicing\Packages\*Hyper-V*.mum >List.txt
for /f %i in ('findstr /i . List.txt 2^>nul') do dism /online /norestart /add-package:"%SystemRoot%\servicing\Packages\%i"
Dism /online /enable-feature /featurename:Microsoft-Hyper-V -All /LimitAccess /ALL
pause